Flowchart
To take a First look at the problem, we assumed that the ball was not moving, and that the robot could not meet any obstacles. This was done to guarantee a fluent execution of a rather simple program. In this ideal situation the whole program could be descirbed by the following flowchart:
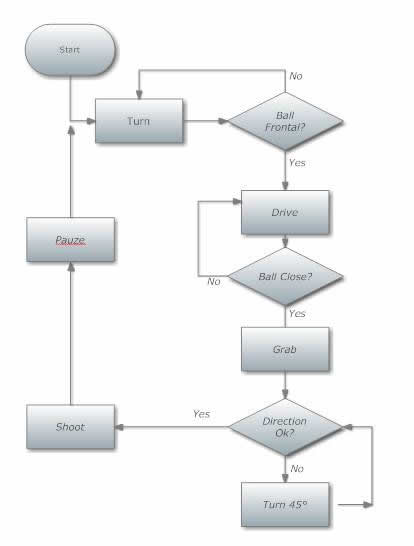
Of course this is a very simple way to describe reality, as we can meet obstacles that cancel certain movements. An other problem is that the ball will be moving during the game. So extra intelligence will be needed. Nonetheless this flowchart points out the most important parts of our program.
Lets overlook the different steps:
Turn : This routine will make the robot turn around its axis for a certain angle.
Ball Frontal? : In combination with the "Turn" subroutine, it is aimed to turn the robot in such a way that the ball is located right in front of the robot. When this is completed, and the ball actually is located right in front, the program will continue to its next step.
Drive : A simple routine who will make robot drive straightforward.
Ball Close? : Again in combination with the "Drive" routine, the robot will check if it has approached the ball close enough to go on to the next step.
Grab : When the ball is actually right in front of the robot, the robot will try to grab it so it can handle it in the next few steps.
Direction Ok? : After the ball has been grabbed, it is important to know if the robot is facing the goal of the adversary, or its own goal. For this matter it will simply check if its front is located in the lighter or darker area of the grayscale. It is not the intention to calculate the exact direction, but only to check that the robot will continue in the direction of the correct gradient.
Turn 45° : As we only strive for a rough estimation of the adversary's goal's location, the robot will turn in quite big steps to scan for the right grey gradient.
Shoot : This routine has the objective to give the ball enough energy to reach the opponent's goal within a rather short time.
Pauze : This pause gives the robot some time to let the ball have its play before hunting it again.
In the next paragraph the real implementation will briefly be discussed:
Introduction
Making this project in assembly is not about writing a few lines and hoping it will work.
First of all, it is about writing many, many lines. Even if a command is very simple in your head, it can take a lot of instructions in assembly.
Secondly, more important, there is no time for "hoping it will work".
I speak to you on a lovely sunday morning. This wednesday, the final will take place, but they are still printing our robot...
(This one sentence is me a week later: the final was postponed to Friday. Anyway, I will let the week ago "me" speak to you again, bye bye)
So, there will be no time to only start programming the day the robot is ready for testing. There is no time for just "hoping it will work" either. When a big assembly program doesn't do what it's supposed to, it's not easy to find the mistake.
The solution: write a few lines, make sure (as sure as possible) that they work, take a break and write the next few lines.
How to test without a robot?
Use the testing board
We made the choice to use a P16F876A, just like the testing board.
Also our "PORTB" was digital output for the LED's, just as in the testing board.
The analogue input voltages between 0V and 5V could come from testing circuits of the sensors, or from the adjustable power source.
Use the simulator
In this project, mainly the simulator helped us very far. At home, there is no testing board.
Also, there are some problems that are not easy to find without turning the speed low or "step by step".
The biggest advantage is: memory view. This is shown in the following example, where the result of "COMPARE" can be tested in the simulator.
Group things that belong together
The following picture shows the main structure of our source code.
There are many little programs that do their own thing. It can seem very difficult to find a way through them. Luckily, the main program is easy to find: totally at thevbottom. After "START", all the different setups are called. Then, there is a main "LOOP". This holds control over the program. Everything has a "Call" and "RETURN", so you always go back to the LOOP, which decides the next step.
There are many little programs that do their own thing. It can seem very difficult to find a way through them.
When the program does not react as desired, you would like to see where the mistake comes from.
To switch on/off some parts of the program, you have to understand where in the code you can disable them.
In our code, there are easy "on/off" switches: one part at a time can be studied. This is shown in the following figure.
Luckily, this feature is easy to find: totally at the top of the code.
The resulting program
- The use of much general purpose register:
giving names=avoiding mistakes
- A very very long code:
each part has to be able to work individual, for testing on the real robot
- Most of the program is written in Dutch:
You try to be sweet and explain it to everyone in English, but after a while you only care about solving it.
- A real manual is needed to see why we did some things in our program,
the comments alone won't help
You can download our assembly code. Please look at the program movie to know what the code should do.
BALL_E_simOK.hex
BallE_simOK.asm
ProgramBallE.wmv
|

