Header image

Software

Initialization

EEPROM

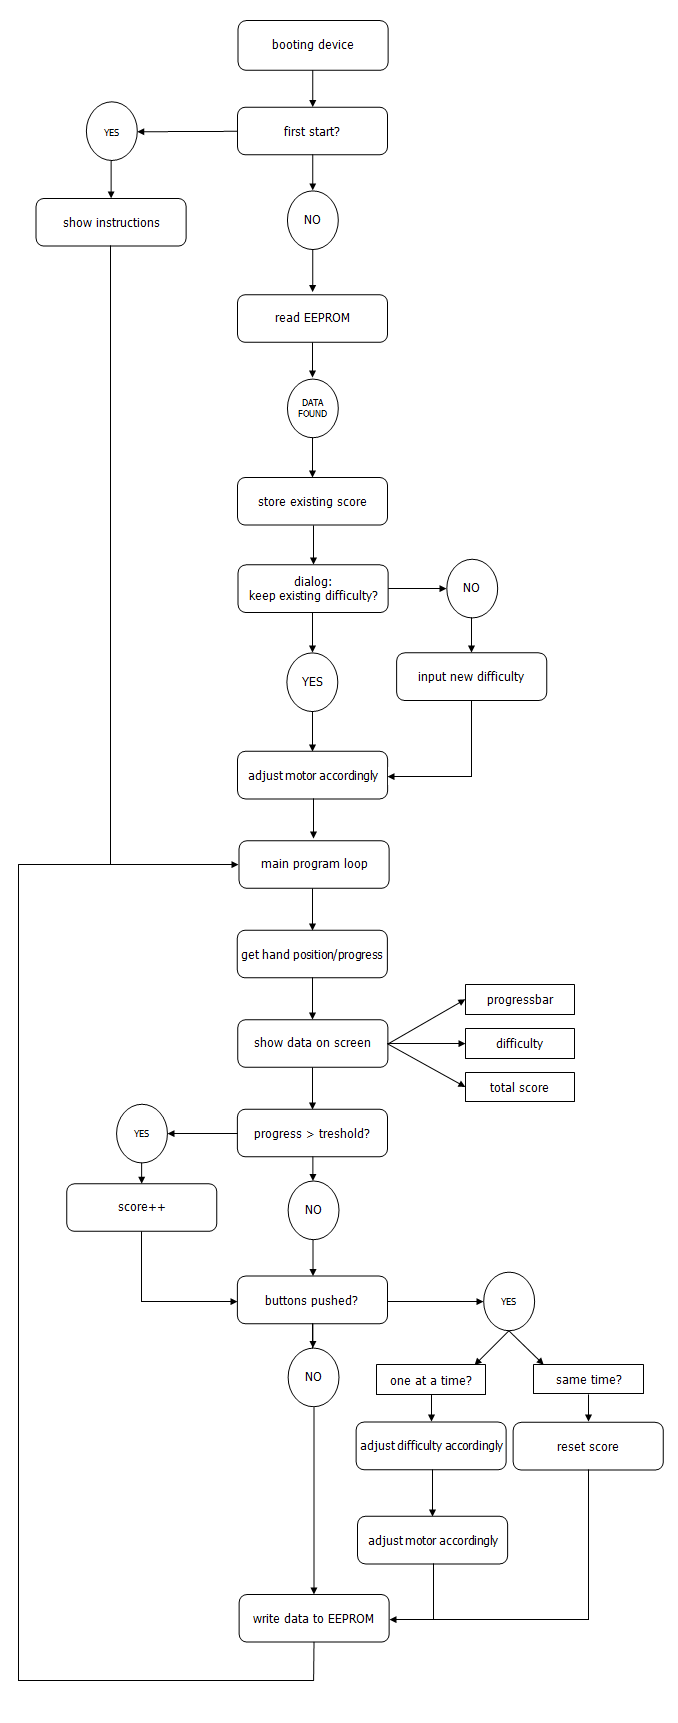
The Arduino's EEPROM is used to store data. When the device is booted, the EEPROM is first read to retrieve stored data, if any.
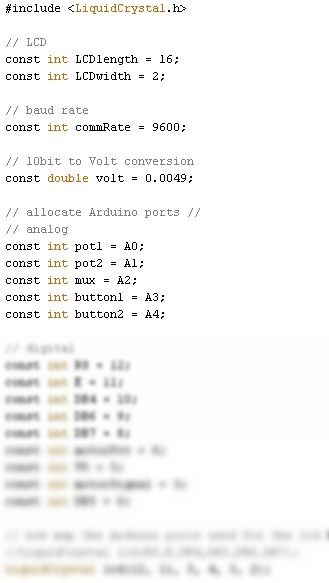
// EEPROM addresses
int levelAddress = 0;
int scoreAddress = 1;
int firstStartAddress = 2;

...

// write to EEPROM every x 10 seconds(s)
unsigned long tStorage = 1;

...

void processEEPROM()
{
  // read previous level from EEPROM
  level = EEPROM.read(levelAddress);
  
  // read previous score from EEPROM
  score = EEPROM.read(scoreAddress);
  
  // started before?
  firstStart = EEPROM.read(firstStartAddress);
  
  if(level > levelMax)
  {
    level = levelMax;
  }
    
  if(level < levelMin)
  {
    level = levelMin;
  }
  
  if(score > scoreMax)
  {
    score = scoreMax;
  }
  
  if(score < scoreMin)
  {
    score = scoreMin;
  }
}

void storeVariables()
{
  EEPROM.write(levelAddress, level);
  EEPROM.write(scoreAddress, score);
}

...

if((millis()%(tStorage*10000))<=1000)
{
storeVariables();
// Serial.println("variables written to EEPROM");
}
relevant code

Welcome, input & motor adjustement

C++-like codeIf the device has never been used before, a short series of instructions will appear.

Next, the required difficulty has to be set. The user can choose whether to use the previous difficulty, read from the EEPROM (if found), or input a new one. This is done through two pushbuttons underneath the LCD.

The motor is positioned according to this setting.

Main loop

The main program basically displays three things:

The loop constantly checks for changes in one of these three conditions, after which the screen is updated to provide the appropriate feedback.

Flow chart

This structure can be visualised in following flow chart:

Specifics

Progress bar

The progress bar is rendered on the two rows of the 2x16 character screen, by using a combination of 8 predefined characters. These characters are stored on initialization in a two-dimensional array as 7x5 matrices, which are the bits that represent one character. Using different for-loops, they're printed on the screen according to the current progress.

byte progressChars[8][8] = {
  
  {
  B00000,
  B00000,
  B00000,
  B00000,
  B00000,
  B00000,
  B00000,
  },

  {
  B00000,
  B00000,
  B00000,
  B00000,
  B00000,
  B00000,
  B11111,
  },
  
  {
  B00000,
  B00000,
  B00000,
  B00000,
  B00000,
  B11111,
  B11111,
  },
  
  {
  B00000,
  B00000,
  B00000,
  B00000,
  B11111,
  B11111,
  B11111,
  },
  
  {
  B00000,
  B00000,
  B00000,
  B11111,
  B11111,
  B11111,
  B11111,
  },
  
  {
  B00000,
  B00000,
  B11111,
  B11111,
  B11111,
  B11111,
  B11111,
  },
  
  {
  B00000,
  B11111,
  B11111,
  B11111,
  B11111,
  B11111,
  B11111,
  },
  
  {
  B11111,
  B11111,
  B11111,
  B11111,
  B11111,
  B11111,
  B11111,
  }
};
void showProgress(int progressTmp)
{
  for(int i=0; i<=7; i++){    
    byte temp[8];
     
    for(int k=0; k<=7; k++) temp[k] = progressChars[i][k];
     
    lcd.createChar(i, temp);
  }
    
  // lcd has 2 rows (0-1) and 16 columns (0-15)
  lcd.begin(LCDlength, LCDwidth);
  
  // set cursor at row 1, column 0 where progress bar starts
  lcd.setCursor(0,1);
  
  // only lower row is needed
  if(progressTmp<=7)
  {
    // write all 8 characters of progress bar to first 8 columns of row 1
    for(int i=0; i<=progressTmp;i++){
      lcd.write(i); 
    }
  }
  
  // upper row is also needed
  if(progressTmp>7 && progressTmp <=15)
  {  
    // write all 8 characters of progress bar to first 8 columns of row 1
    for(int i=0; i<=7;i++){
      lcd.write(i); 
    }
      
    // write rest of progress bar with combination of second and first row
    for(int i=0; i<=(progressTmp-7);i++){
      // for row 1, fill the appropriate black rectangles
      // set cursor at right place on row 0
      lcd.setCursor(8+i,1);
      // write char (full rectangle)
      lcd.write(7);
      
      // for row 0, column 8 - 15 fill with progress bar characters 0 - 7
      // set cursor at first row
      lcd.setCursor(8+i,0);
      // write char
      lcd.write(i+1);
      
      if(progressTmp==15)
      {
        lcd.setCursor(15,0);
        lcd.write(7);
      }
    }
  }
}
 while(true)
  {
    multiLine("Press the","+-button to...");
    
    for(int i=0;i<=tDialog;i=i+tDialogSteps)
    {
      if(analogRead(buttonMin)*volt > (double)5)
      {
        exitLoop=true;
        break;
      }   
      delay(tDialogSteps);
    }
    lcd.clear();
    
    if(exitLoop)
    {
      break;
    }
      
    multiLine("continue during","this tutorial.");
    for(int i=0;i<=tDialog;i=i+tDialogSteps)
    {
      if(analogRead(buttonMin)*volt > (double)5)
      {
        exitLoop=true;
        break;
      }   
      delay(tDialogSteps);
    }
    
    if(exitLoop)
    {
      break;
    }
    
    lcd.clear();
  }
//Pin connected to ST_CP of 74HC595
int latchPin = 2;
//Pin connected to SH_CP of 74HC595
int clockPin = 4;
////Pin connected to DS of 74HC595
int dataPin = 7;
int maxLED = 1000;
int perLED = maxLED/8;
byte data = 0;

...

void demux()
{
  int pos = analogRead(potHand);
  
  if(pos<maxLED && pos>(maxLED-perLED))
  {
    digitalWrite(latchPin, 0);
    lightShiftPin(0);
    digitalWrite(latchPin, 1);
  }
  
  for(int i=7;i>=1;i--)
  {
    int counter = 8-i;
    int upper = maxLED-perLED*counter;
    int lower = maxLED-perLED*(counter+1);
    if(pos<(upper) && pos>(lower))
    {
      digitalWrite(latchPin, 0);
      lightShiftPin(i);
      digitalWrite(latchPin, 1);
    }
  }
}
progressChars[][] array
showProgress() procedure

Button checking & displaying information

When displaying sentence-like information on the screen, a first problem was how to do this. 32 characters in total on one screen often isn't quite enough. The solution would be to switch between screens with a certain delay. However, we also need to provide the option to skip to the next piece of information. We solved this issue by implementing several for- inside an infinite while-loop. This for-loop increments with small intervals while checking for button activity at the same time.

typical while-for structure

Animating using multiplexed LEDS

When implementing the LED animation, we discovered that when sending the byte 0, the second LED lit up instead of the first. Coding this "problem" structurally was done using the demux() procedure below.

demux() procedure

Source

The whole self-written source code is contained within a single Arduino IDE-specific pde file. Used external libraries are the following:

These are all included by default within the Arduino IDE. Since they're in the public domain, the used versions are also included below.

Manual

Although the program has the basic instructions built-in, a more detailed manual can be downloaded here.

Simulation